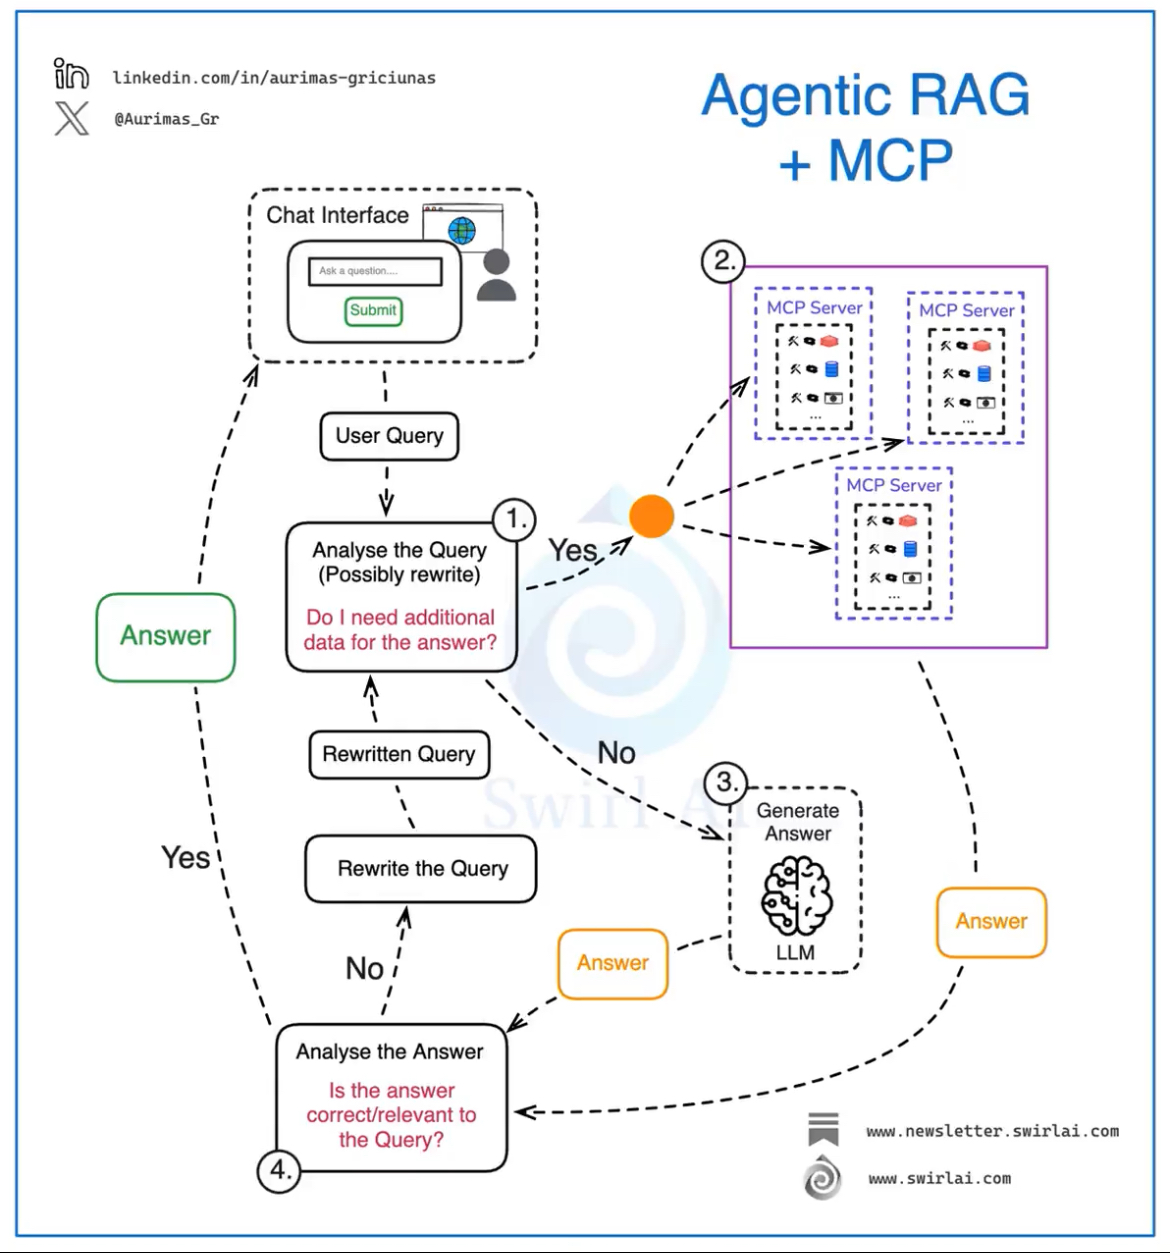
Install

1. OS (AMI Linux 2)

$ cat /etc/system-release
Amazon Linux release 2 (Karoo)

2. Installed Package

  • releated krb5
  • ntp
$ sudo yum list installed | grep krb
krb5-devel.x86_64                     1.15.1-19.amzn2.0.3            @amzn2-core
krb5-libs.x86_64                      1.15.1-19.amzn2.0.3            @amzn2-core
krb5-server.x86_64                    1.15.1-19.amzn2.0.3            @amzn2-core
krb5-workstation.x86_64               1.15.1-19.amzn2.0.3            @amzn2-core
pam_krb5.x86_64                       2.4.8-6.amzn2.0.2              @amzn2-core

$ sudo yum list installed | grep ntp
fontpackages-filesystem.noarch        1.44-8.amzn2                   @amzn2-core

Reference


Settings

Summary

1. EC2 (2EA) - master, slave (HA)

2. DNS (Route 53, abcdef.com for sample)

- kdc.abcdef.com

- kdc2.abcdef.com


Configuration

1. /etc/krb5.conf 설정

- realm domain should upper string

$ cat /etc/krb5.conf
# Configuration snippets may be placed in this directory as well
includedir /etc/krb5.conf.d/

[logging]
 kdc = FILE:/var/log/kerberos/krb5kdc.log
 admin_server = FILE:/var/log/kerberos/kadmin.log
 default = FILE:/var/log/kerberos/krb5lib.log

[libdefaults]
 default_realm = ABCDEF.COM
 dns_lookup_realm = false
 dns_lookup_kdc = false
 rdns = false
 ticket_lifetime = 24h
 renew_lifetime = 7d
 forwardable = true

[realms]
 ABCDEF.COM = {
  kdc = kdc.abcdef.com:88
  kdc = kdc2.abcdef.com:88
  admin_server = kdc.abcdef.com:749
  default_tkt_enctypes = aes256-cts-hmac-sha1-96 aes128-cts-hmac-sha1-96 aes256-cts-hmac-sha384-192 aes128-cts-hmac-sha256-128 des3-cbc-sha1 arcfour-hmac-md5 camellia256-cts-cmac camellia128-cts-cmac des-cbc-crc des-cbc-md5 des-cbc-md4
  default_tgs_enctypes = aes256-cts-hmac-sha1-96 aes128-cts-hmac-sha1-96 aes256-cts-hmac-sha384-192 aes128-cts-hmac-sha256-128 des3-cbc-sha1 arcfour-hmac-md5 camellia256-cts-cmac camellia128-cts-cmac des-cbc-crc des-cbc-md5 des-cbc-md4
  permitted_enctypes = aes256-cts-hmac-sha1-96 aes128-cts-hmac-sha1-96 aes256-cts-hmac-sha384-192 aes128-cts-hmac-sha256-128 des3-cbc-sha1 arcfour-hmac-md5 camellia256-cts-cmac camellia128-cts-cmac des-cbc-crc des-cbc-md5 des-cbc-md4
 }

[domain_realm]
# .example.com = EXAMPLE.COM
# example.com = EXAMPLE.COM   


2. /var/kerberos/krb5kdc/kdc.conf 

[kdcdefaults]
 kdc_ports = 88
 kdc_tcp_ports = 88

[realms]
 ABCDEF.COM = {
  kadmind_port = 749
  max_life = 9h 0m 0s
  max_renewable_life = 7d 0h 0m 0s
  master_key_type = des3-hmac-sha1
  supported_enctypes = aes256-cts-hmac-sha1-96:normal aes128-cts-hmac-sha1-96:normal des3-cbc-sha1:normal arcfour-hmac-md5:normal
  database_name = /var/kerberos/krb5kdc/principal
  admin_keytab = /var/kerberos/krb5kdc/kadm5.keytab
  acl_file = /var/kerberos/krb5kdc/kadm5.acl
  dict_file = /var/kerberos/krb5kdc/kadm5.dict
  key_stash_file = /var/kerberos/krb5kdc/.k5.ABCDEF.COM
 }


3. /var/kerberos/krb5kdc/kadm5.acl 

*/admin@ABCDEF.COM  *


4. Create KDC database

kdb5_util create -r ABCDEF.COM -s


5. Create KDC admin

# kadmin.local
kadmin.local:  addprinc account/admin@ABCDEF.COM
     
NOTICE: no policy specified for "admin/admin@ABCDEF.COM";
assigning "default".

Enter password for principal admin/admin@ATHENA.MIT.EDU:  (Enter a password.)
Re-enter password for principal admin/admin@ATHENA.MIT.EDU: (Type it again.)

Principal "admin/admin@ABCDEF.COM" created.
 
kadmin.local:


6. KDC database Backup & Restore

Create script & run crontab & propagate to slave server

#!/bin/bash

/usr/sbin/kdb5_util dump /var/kerberos/slave_datatrans


/usr/sbin/kprop -f /var/kerberos/slave_datatrans mgmt-krb-kdc02.abcdef.com > /dev/null
  • FYI, domain information in /etc/hosts
% cat /etc/hosts

... 
10.100.125.156     mgmt-krb-kdc02.abcdef.com mgmt-krb-kdc02


7. Daemon start & enable

systemctl start krb5kdc.service
systemctl start kadmin.service
systemctl enable krb5kdc.service
systemctl enable kadmin.service


반응형

'Setup' 카테고리의 다른 글

Kerberos setup - 3 (MacOS User)  (0) 2019.12.09
Kerberos setup - 2 (Kerberos Client)  (0) 2019.12.09
OpenVPN setup - 3 (OpenVPN Client for VPC Tunnel)  (0) 2019.12.09
OpenVPN setup - 2 (OpenVPN Server)  (0) 2019.12.09
OpenVPN setup - 1 (AWS EC2)  (0) 2019.12.09

 I want to use Linux OpenVPN client for the tunnel.


OpenVPN Client Install

Insatll (Linux AMI 2)

# amazon-linux-extras install epel
# yum -y install openvpn easy-rsa iptables-services


Setting


# Copy autologin profile for auto login.

vi /etc/openvpn/client/vpn_cli01.conf

# Service start open VPN Client


systemctl status openvpn-client@vpn_cli01.service
systemctl start openvpn-client@vpn_cli01.service

# Kernel option


'net.ipv4.ip_forward' default = 0

I need to forward ipv4, so I change 0 -> 1


[ec2-user@ip-10-??-???-??? ~]$ cat /etc/sysctl.conf
# Kernel sysctl configuration file for Red Hat Linux
#
# For binary values, 0 is disabled, 1 is enabled.  See sysctl(8) and
# sysctl.conf(5) for more details.
# Controls IP packet forwarding
net.ipv4.ip_forward = 1
# Controls source route verification
net.ipv4.conf.default.rp_filter = 1
# Do not accept source routing
net.ipv4.conf.default.accept_source_route = 0
# Controls the System Request debugging functionality of the kernel
kernel.sysrq = 0
# Controls whether core dumps will append the PID to the core filename.
# Useful for debugging multi-threaded applications.
kernel.core_uses_pid = 1
# Controls the use of TCP syncookies
net.ipv4.tcp_syncookies = 1
# Controls the default maxmimum size of a mesage queue
kernel.msgmnb = 65536
# Controls the maximum size of a message, in bytes
kernel.msgmax = 65536
# Controls the maximum shared segment size, in bytes
kernel.shmmax = 68719476736
# Controls the maximum number of shared memory segments, in pages
kernel.shmall = 4294967296


# OpenVPN Setting on admin webpage

When I want to connect VPC1 -> VPC2 and set like this.

  • I assign to user : 192.168.xxx.xxx/16
  • VPC2 IPv4 CIDR : 10.50.0.0/16


# EC2 network setting

I'd like to use this EC2 instance for routing.

So, you must disable this option. (OpenVPN Server & Client both)


 When ip.src/dst is different block or allow option


# Setup Routing Table

You must consider request & response both routing table.

반응형

Set OpenVPN custom account


# 1. myadmin account create                                                        
                                                                                
    % sudo useradd -s /sbin/nologin "myadmin"                                
    % sudo passwd myadmin                                                    
                                             

# 2. Configuration file path                                                              

    /usr/local/openvpn_as/etc                                                       
               
                                                                 
# 3. custom admin login setup users.0

    % sudo vim /usr/local/openvpn_as/etc/as.conf           
                                                                                
    ## allowed to access via the bootstrap auth mechanism.                       
    boot_pam_service=openvpnas                                                  
    boot_pam_users.0=myadmin                                                 
    # boot_pam_users.1=                                               
    # boot_pam_users.2=                                                         
    # boot_pam_users.3=                                                         
    # boot_pam_users.4=                                                         


# 4. Restart openvpn server                                               
    % sudo service openvpnas restart  
반응형

Setup environment: AWS

OpenVPN Server 

Select AMI for purchase license


Select Region & Continue to Launch

I choose 'Launch through EC2'. I need to set more details.

I recommend 'Launch from Website' . This option is much easy to setup.


반응형

GHE server version: 2.19.2

Reference

https://stackoverflow.com/a/51003334/8163714

Github Webhooks

Setup fail Case

Enterprise - settings - Hooks (not working)


Success Case

Set each Organization


Github token

Create token

Create a personal token for Jenkins (I used a system account for this job)

I selected all-access, it's the stage test case.

I'll select releated repos access for the production case.

I'll use this key for Jenkins.


Set jenkins credential

Use token for Jenkins credential.


Install Plugin

Github Plugin


GitHub Plugin - Jenkins - Jenkins Wiki

Github Plugin This plugin integrates Jenkins with Github projects.The plugin currently has three major functionalities: Create hyperlinks between your Jenkins projects and GitHubTrigger a job when you push to the repository by groking HTTP POSTs from post-

wiki.jenkins.io

Set jenkins Github server

Set URL & credential.


Build Triggers for Jenkins job


Set Post-build Actions for Jenkins job

I use default except 'Status result'.


Setup Result

After PR & Merge, run jenkins and set build status.


Build Success


Build Failure


반응형

GHE server version: 2.19.2

Reference

https://github.community/t5/GitHub-Enterprise-Best-Practices/High-Availability-and-Disaster-Recovery-for-GitHub-Enterprise/ba-p/11725

https://help.github.com/en/enterprise/2.19/admin/installation/configuring-github-enterprise-server-for-high-availability

HA (Normal Case - Primary & Replica normal status)

Primary Side

Mode change to 'Maintnance mode'

Run command

  • ghe-maintenance -s

admin@githubtest-testdomain-io:~$ ghe-maintenance -s


Replica Side

Change AWS Route 53 IP address

  • primary → replica


Run command (GHE status change replica to primary)

  • ghe-repl-promote
admin@ip-172-3?-???-???:~$ ghe-repl-promote
Warning: You are about to promote this Replica node
Promoting this Replica will tear down replication and enable maintenance mode on the current Primary.
All other Replicas need to be re-setup to use this new Primary server.
 
Proceed with promoting this appliance to Primary? [y/N] y
Enabling maintenance mode on the primary to prevent writes ...
Stopping replication ...
  | Stopping Pages replication ...
  | Stopping Git replication ...
  | Stopping Alambic replication ...
  | Stopping git-hooks replication ...
  | Stopping MySQL replication ...
  | Stopping Redis replication ...
  | Stopping Consul replication ...
  | Success: Replication was stopped for all services.
  | To disable replica mode and remove all replica configuration, run 'ghe-repl-teardown'.
Switching out of replica mode ...
  | Dec 04 07:41:45 Preparing storage device...
  | Dec 04 07:41:46 Updating configuration...
  | Dec 04 07:41:46 Reloading system services...
  | Dec 04 07:42:18 Running migrations...
  | Dec 04 07:42:54 Reloading application services...
  | Dec 04 07:43:18 Done!
  | jq: error (at :0): Cannot index number with string "settings"
  | Success: Replication configuration has been removed.
  | Run `ghe-repl-setup' to re-enable replica mode.
Applying configuration and starting services ...
  | ERROR: cannot launch /usr/local/bin/ghe-single-config-apply - run is locked
admin@ip-172-3?-???-???:~$


Former Primary Side

Former primary mode change to replica

Run command

  • ghe-repl-setup 172.3?.???.???
  • ghe-repl-start
  • ghe-repl-status
  • ghe-maintenance -u (maintnace mode unset)
admin@githubtest-testdomain.io:~$ ghe-repl-setup 172.3?.???.???
Warning: This appliance is or has been a configured appliance.
Proceeding will overwrite data on this appliance.
 
Proceed with initializing this appliance as a replica? [y/N] y
Verifying ssh connectivity with 172.3?.???.??? ...
Connection check succeeded.
Updating Elasticsearch configuration ...
Copying license and settings from primary appliance ...
 --> Importing SSH host keys...
 --> The SSH host keys on this appliance have been replaced to match the primary.
 --> Please run 'ssh-keygen -R 172.3?.XXX.XXX; ssh-keygen -R "[172.3?.XXX.XXX]:122"' on your client to prevent future ssh warnings.
Copying custom CA certificates from primary appliance ...
Success: Replica mode is configured against 172.3?.???.???.
To disable replica mode and undo these changes, run 'ghe-repl-teardown'.
Run 'ghe-repl-start' to start replicating from the newly configured primary.
 
admin@githubtest-testdomain.io:~$ ghe-repl-start
Verifying ssh connectivity with 172.3?.???.??? ...
Updating configuration...
Validating configuration
Updating configuration for githubtest-testdomain.io-primary (172.3?.???.???)
Configuration Updated
Configuration Phase 1
githubtest-testdomain.io-replica: Dec 04 07:49:43 Preparing storage device...
githubtest-testdomain.io-replica: Dec 04 07:49:45 Updating configuration...
githubtest-testdomain.io-replica: Dec 04 07:49:45 Reloading system services...
githubtest-testdomain.io-replica: Dec 04 07:50:04 Done!
githubtest-testdomain.io-primary: Dec 04 07:49:43 Preparing storage device...
githubtest-testdomain.io-primary: Dec 04 07:49:45 Updating configuration...
githubtest-testdomain.io-primary: Dec 04 07:49:45 Reloading system services...
githubtest-testdomain.io-primary: Dec 04 07:50:10 Done!
Configuration Phase 2
githubtest-testdomain.io-replica: Dec 04 07:50:13 Running migrations...
githubtest-testdomain.io-replica: Dec 04 07:50:13 Done!
githubtest-testdomain.io-primary: Dec 04 07:50:15 Running migrations...
githubtest-testdomain.io-primary: Dec 04 07:50:47 Done!
Configuration Phase 3
githubtest-testdomain.io-primary: Waiting for services to be active...
githubtest-testdomain.io-primary: Dec 04 07:51:06 Reloading application services...
githubtest-testdomain.io-primary: Dec 04 07:51:29 Done!
githubtest-testdomain.io-replica: Dec 04 07:50:48 Reloading application services...
githubtest-testdomain.io-replica: Dec 04 07:51:59 Done!
Finished cluster configuration
Success: replication is running for all services.
Run `ghe-repl-status' to monitor replication health and progress.


admin@githubtest-testdomain.io:~$ ghe-repl-status
OK: mysql replication is in sync
OK: redis replication is in sync
OK: elasticsearch cluster is in sync
OK: git replication is in sync
OK: pages replication is in sync
OK: alambic replication is in sync
OK: git-hooks replication is in sync
OK: consul replication is in sync


admin@githubtest-testdomain.io:~$ ghe-maintenance -u


HA (Disaster case - Primary EC2 terminated)

If Primary EC2 instance terminated.

Just run this command replica side

  • ghe-repl-promote

And change Route53 DNS IP address to replica


admin@githubtest-testdomain.io-replica:~$ ghe-repl-promote
Warning: You are about to promote this Replica node
Promoting this Replica will tear down replication and enable maintenance mode on the current Primary.
All other Replicas need to be re-setup to use this new Primary server.
 
Proceed with promoting this appliance to Primary? [y/N] y
ssh: connect to host 172.3?.???.??? port 122: Connection timed out
Warning: Primary node is unavailable.
Warning: Performing hard failover without cleaning up on the primary side.
Stopping replication ...
  | Skipping Pages, Alambic, git-hooks and Git replication cleanup on primary ...
  | Stopping MySQL replication ...
  | Stopping Redis replication ...
  | Stopping Consul replication ...
  | Success: Replication was stopped for all services.
  | To disable replica mode and remove all replica configuration, run 'ghe-repl-teardown'.
Switching out of replica mode ...
  | ssh: connect to host 172.3?.???.??? port 122: Connection timed out
  | ssh: connect to host 172.3?.???.??? port 122: Connection timed out
  | ssh: connect to host 172.3?.???.??? port 122: Connection timed out
  | ssh: connect to host 172.3?.???.??? port 122: Connection timed out
  | ssh: connect to host 172.3?.???.??? port 122: No route to host
  | jq: error (at :0): Cannot index number with string "settings"
  | jq: error (at :0): Cannot index number with string "settings"
  | Success: Replication configuration has been removed.
  | Run `ghe-repl-setup' to re-enable replica mode.
Applying configuration and starting services ...
Success: Replica has been promoted to primary and is now accepting requests.


반응형

GHE server version: 2.19.2

Reference

https://github.community/t5/GitHub-Enterprise-Best-Practices/High-Availability-and-Disaster-Recovery-for-GitHub-Enterprise/ba-p/11725

https://help.github.com/en/enterprise/2.19/admin/installation/configuring-github-enterprise-server-for-high-availability


Configuring GitHub Enterprise Server for high availability - GitHub Help

Administrator Guides Installation and configuration Configuring GitHub Enterprise Server for high availability Configuring GitHub Enterprise Server for high availability GitHub Enterprise Server supports a high availability mode of operation designed to mi

help.github.com

Create 1 more EC2 instance for GHE image.

Replication server could use same license file.

Select installation type

  • Configure as Replica

After finish setup.

Run command (Replica VM)

  • ghe-repl-setup $PRIMARY_VM_IP_ADDRESS
admin@ip-172-3?-???-???:~$ ghe-repl-setup 172.3?.???.???
Generating public/private ed25519 key pair.
/home/admin/.ssh/id_ed25519 already exists.
Overwrite (y/n)? Your identification has been saved in /home/admin/.ssh/id_ed25519.
Your public key has been saved in /home/admin/.ssh/id_ed25519.pub.
The key fingerprint is:
SHA256:t3C46zQrYB/???????????????????????s1dc/e4Ho admin-ssh-key
The key's randomart image is:
+--[ED25519 256]--+
| o++o. . .       |
|..o.* + . o      |
|.. = O     +     |
|  . * o  .o o    |
|   o * oS.oo .   |
|    B O o=..     |
|   o * *+..E     |
|      =. +.      |
|       o+        |
+----[SHA256]-----+
Connection check failed.
The primary GitHub Enterprise Server appliance must be configured to allow replica access.
Visit http://172.3?.???.???/setup/settings and authorize the following SSH key:

ssh-ed25519 AAAAC3NzaC1lZDI1NTE5AAAAIJev???????????????????????YEf1Kvx7AyBAduoMe admin-ssh-key

Run `ghe-repl-setup 172.3?.???.???' once the key has been added to continue replica setup


Use command result key

  • ssh-ed25519 AAAAC3NzaC1lZDI1NTE5AAAAIJev?????????????????wYEf1Kvx7AyBAduoMe admin-ssh-key

Visit Primary & add ssh key

  • Visit http://172.3?.???.???/setup/settings and authorize the following SSH key


Run command (Replica VM)

  • ghe-repl-setup $PRIMARY_VM_IP_ADDRESS
  • ghe-repl-start
  • ghe-repl-status
admin@ip-172-3?-???-???:$ ghe-repl-setup 172.3?.???.???
Verifying ssh connectivity with 172.3?.???.??? ...
Connection check succeeded.
Updating Elasticsearch configuration ...
Elasticsearch isn't listening on tcp/9200.
Copying license and settings from primary appliance ...
 --> Importing SSH host keys...
 --> The SSH host keys on this appliance have been replaced to match the primary.
 --> Please run 'ssh-keygen -R 172.3X.XX.XXX; ssh-keygen -R "[172.3X.XX.XXX]:122"' on your client to prevent future ssh warnings.
Copying custom CA certificates from primary appliance ...
Success: Replica mode is configured against 172.3?.???.???.
To disable replica mode and undo these changes, run 'ghe-repl-teardown'.
Run 'ghe-repl-start' to start replicating from the newly configured primary.


admin@ip-172-3?-???-???:$ ghe-repl-start
Verifying ssh connectivity with 172.3?.???.??? ...
Updating configuration...
Validating configuration
Updating configuration for githubtest-testserver-io-primary (172.3?.???.???)
Configuration Updated
Configuration Phase 1
githubtest-testserver-io-primary: Dec 04 05:46:52 Preparing storage device...
githubtest-testserver-io-primary: Dec 04 05:46:54 Updating configuration...
githubtest-testserver-io-primary: Dec 04 05:46:55 Reloading system services...
githubtest-testserver-io-primary: Dec 04 05:47:19 Done!
githubtest-testserver-io-replica: Dec 04 05:46:52 Preparing storage device...
githubtest-testserver-io-replica: Dec 04 05:46:54 Updating configuration...
githubtest-testserver-io-replica: Dec 04 05:46:55 Reloading system services...
githubtest-testserver-io-replica: Dec 04 05:48:11 Done!
Configuration Phase 2
githubtest-testserver-io-replica: Dec 04 05:48:12 Running migrations...
githubtest-testserver-io-replica: Dec 04 05:48:12 Done!
githubtest-testserver-io-primary: Dec 04 05:48:12 Running migrations...
githubtest-testserver-io-primary: Dec 04 05:48:28 Done!
Configuration Phase 3
githubtest-testserver-io-primary: Waiting for services to be active...
githubtest-testserver-io-primary: Dec 04 05:48:47 Reloading application services...
githubtest-testserver-io-primary: Dec 04 05:49:10 Done!
githubtest-testserver-io-replica: Dec 04 05:48:30 Reloading application services...
githubtest-testserver-io-replica: Dec 04 05:50:06 Done!
Finished cluster configuration
Success: replication is running for all services.
Run `ghe-repl-status' to monitor replication health and progress.


admin@ip-172-3?-???-???:$ ghe-repl-status
OK: mysql replication is in sync
OK: redis replication is in sync
OK: elasticsearch cluster is in sync
OK: git replication is in sync
OK: pages replication is in sync
OK: alambic replication is in sync
OK: git-hooks replication is in sync
OK: consul replication is in sync
반응형

GHE server version: 2.19.2

License

https://enterprise.github.com/dashboard (Free Trial or Purchase license)

After Sign in, click 'Download' on top of the menu.


Step 1. Download license


Appliance

Step 2. Appliance

Select Cloud vendor & region

I selected AWS & Mumbai region.


AWS 'EC2' Dashboard & Click Launch Instance

Search AMI with AMI ID: ami-06e551001e2d40c1a

Set EC2 and launch 

  • Storage add EBS at least 10GB

Install

Read manual 1st.

https://help.github.com/en/enterprise/2.19/admin/installation/installing-github-enterprise-server-on-aws


Installing GitHub Enterprise Server on AWS - GitHub Help

Administrator Guides Installation and configuration Setting up a GitHub Enterprise Server instance Installing GitHub Enterprise Server on AWS Installing GitHub Enterprise Server on AWS To install GitHub Enterprise Server on Amazon Web Services (AWS), you m

help.github.com


Need to open 122(ssh), 8443(https) TCP port before start setup


Upload your license file & set password.


Select installation type

  • New Install


Route53 add dns


set hostname & Test domain settings


SSL setup & Click Save settings


Finish setup & Click 'Save settings' 


After finish setup and hostname not working. Then use this link


반응형

+ Recent posts